Monday, June 11, 2012

Our all time favorite cookie recipe.

These peanut butter cup cookies are one of my holiday "staples".  They are also my most requested.  I recently made them for a charity event at my son's school.  My boys were happy that I made an extra batch of cookies just for them:)


I use Betty Crocker's Recipe for peanut butter cookie dough:

1/2 cup butter
1/2 cup peanut butter
1/2 cup sugar
1/2 cup brown sugar
1/2 teaspoon baking soda
1/2 teaspoon baking powder
1 egg
1/2 teaspoon vanilla
1 1/4 all-purpose flour
*small bowl of sugar for rolling dough

*TIP~pre make and refrigerate dough for 1-2 hours (or even overnight) before rolling into balls.


While I'm rolling the dough, I'm giving it a good "sugar rolling". 


Don't forget to unwrap your chocolate prior to baking.  To determine how many pieces of candy you will need to unwrap, ROLL out ALL your dough FIRST before baking.  Then set the candy pieces in front of your little "helpers" to unwrap.  My youngest LOVES helping unwrap.  Ofcourse, he probably loves it more that he has a separate pile of candy for him to unwrap and eat as he goes;)


Once I am ready to bake, I pop the dough into mini muffin tins, then bake at 375 for 9 minutes.  As soon as I take the tins out of the oven, I push a peanut butter cup onto the tops of each cookie.  Then I quickly place the tin in the freezer to "cool" for 6 minutes.  Then I gently lift the cookies out of the tin and place on a cooling rack to help "set" the chocolate.  BE careful.  The chocolate will slide right off the cookie if you aren't too careful;)  Give these cookies a mininum of 2 hours before packaging, to ensure chocolate is set.

I LOVE making these cookies!!! They are so EASY! You can have everything ready before you actually start baking!!  Enjoy:)

Tuesday, June 5, 2012

Beautiful Towel Cake for Mother's Day/Showers/anytime, really.

Around Mother's Day this past year, I made a "Towel Cake" for a fundraiser at my son's school.  I was definitely nervous making this, as I've never made one before, and it turned out really pretty.  I didn't want to raffle it off.  ;)


PHEW!!!!  All done:)  I used corsage pins to keep the towels in place, and I had fun with ribbons and flowers.  I only wish my camera took better pictures, and that my husband's mountain dew bottle wasn't in the background!  That man some days!;)


Monday, June 4, 2012

A pretty cool 3-D floral card.

It's been a rough couple of weeks for me with hurting my neck and back.  Don't ask.  I have no idea what I did.  I just woke up with a kink in my neck and it escalated from there.  In the meantime, I have been stuck on the couch with an ice pack.  I've been going a little stir crazy, but was able enough to put this Floral Birthday Card together for my girlfriend's 40th birthday.  I really like the way it turned out, and since I couldn't shop for scrapbooking supplies, I had to settle for what I had on hand (eek, scary for me;)   Check it out:


This is the paper I had on hand...hahaha, I did make some mistakes and had to scrounge around for more.  It happens.  Especially when you have an idea but can't quite make the pieces connect;)  But then inspiration took over...


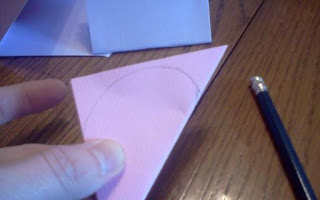
I started folding squares into fours, and then into a triangle...


Then I drew the shape I wanted to cut the flower edges into....


I cut out my shape...


...and OOPS!  There goes that flower!  Note to self, pay attention to the center of the paper when folding so I know where to cut...


That's better:)  I only ended up needing 6 flower shapes.


I next glue-gunned some buttons for "stamens"...


Then I free-handed a "vase" (while staring at my collection of vases)...


OH!  and then I realized I would have to "scrapbook" the inside of my card BEFORE I could put together the front of it.  I didn't want to smash any of my pretty flowers;)
 

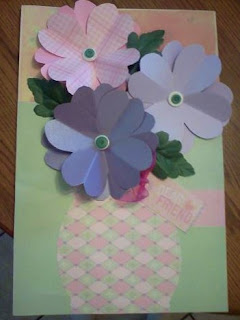
THERE!  The front of my girlfriend's card:)  I did attach some pink ribbon to the "dear friend" tag, and located some artificial leaves to mix up the look.  It's very 3-D.  I love it:) 
It sure felt nice to be able to craft again!